Croque Monsieur

Croque Monsieur | Pinky's Pantry
I found out that today is National Sandwich Day. Who knew we had a day dedicated to sandwiches? I love sandwiches. They’re the easiest thing to pack for lunch, they’re adorable cut into dainty little shapes for tea, and our family road trips just wouldn’t be the same without a cooler of sandwiches and drinks in the trunk of the car.

It’s commonly believed that the sandwich was the invention of John Montagu who was the 4th Earl of Sandwich in England. I can’t vouch for the truth of that, but the story goes that Lord Sandwich was a notorious gambler. They say he spent long hours at the gaming tables and rather than get up to eat, he would ask the servants to bring him some sliced meat between two pieces of bread so he could hold the food in one hand and keep his cards in the other. His friends embraced the custom and when they got hungry, they would ask for “the same as Sandwich” and that’s how the sandwich got its auspicious beginnings.

Anyway, in deference to National Sandwich Day, I decided to make Croque Monsieur for dinner tonight. Croque Monsieur is typical French bistro fare. Fancy as its name is, it’s basically just a grilled ham and cheese sandwich topped with béchamel sauce and more cheese. It’s delicious served all hot and melty with a glass of wine or an ice cold beer. If you top a Croque Monsieur with a fried egg, you’ll have what’s called a Croque Madame. But that’s for another post.

CROQUE MONSIEUR
(Makes 6 sandwiches)

  • 2 Tbsp. butter
  • 2 Tbsp. flour
  • 1 cup whole milk
  • ¼ cup grated fresh parmesan cheese
  • pinch of ground nutmeg
  • salt, to taste
  • pepper, to taste
  • 12 slices firm white sandwich bread
  • room temperature butter for spreading on the bread slices
  • 1 jar dijon mustard
  • 6 ozs. thinly sliced Black Forest ham or Virginia ham
  • 8-10 ozs. Gruyère cheese (can substitute Emmental, Comté, or Swiss cheese)
  1. Slice enough Gruyere to make 6 sandwiches (6 or 7 ozs.) and grate the rest to use for topping. Set cheese aside.
  2. Make béchamel sauce by melting 2 tablespoons butter over medium heat in a small saucepan.
  3. Add flour, whisking until well combined.
  4. Gradually whisk in milk, parmesan cheese, and nutmeg.
  5. Season with salt and pepper to taste.
  6. Cook until sauce thickens, whisking constantly, about 2 minutes.
  7. Set béchamel aside and preheat broiler to high. You’ll broil the sandwiches later.
  8. Butter one side of all 12 slices of bread.
  9. Heat a cast iron skillet over medium heat on the stove.
  10. Place 3 of the bread slices, butter side down, in the skillet.
  11. Brush some mustard on top of each slice of bread in the skillet.
  12. Top each with a slice of ham and a slice of Gruyère.
  13. Cover sandwiches with 3 slices of bread, butter side up.
  14. Cook until deep golden brown, then carefully flip over and cook other side.
  15. Transfer to a baking sheet and repeat with remaining bread.
  16. Spoon béchamel sauce over each sandwich.
  17. Sprinkle a little grated Gruyère over béchamel.
  18. Place under broiler until cheese is melted and light brown.
  19. Serve hot.

Three-Cheese Garlic Bread

Three Cheese Garlic Bread | Pinky's Pantry
When you’re looking for a nice accompaniment to a bowl of hot soup or a refreshing salad, you need look no further than this cheesy garlic bread. I even just eat it by itself for a light meal. It’s so yummy and addictive. It’s hard to stop at one slice.

If you want, you could also slice your loaf in half horizontally, then spread the filling on each bread half and bake them till the topping is hot and bubbly. When done, cut the bread into one-inch slices and serve warm. M-m-m!

THREE-CHEESE GARLIC BREAD

  • 2 cups grated mozzarella cheese
  • 1 cup grated cheddar cheese
  • ½ cup grated parmesan cheese
  • ½ cup mayonnaise
  • 1 stick butter, at room temperature
  • 4-6 cloves garlic, finely minced
  • 3 stalks green onions, chopped
  • 1 loaf French or Italian bread (not sourdough)
  1. Preheat oven to 425°F. Line a baking sheet with foil or parchment paper.
  2. In a bowl, combine the cheeses, mayonnaise, butter, garlic, and green onions.
  3. Slice bread into ½-inch thick slices.
  4. Spread cheese mixture on each slice of bread and arrange on baking sheet.
  5. Bake for 8-10 minutes or until cheese is hot and bubbly.
  6. Serve warm.

Cheesy Bacon Tater Tots

Cheesy Bacon Tater Tots | Pinky's Pantry
Did you know that February 2nd is National Tater Tot Day? It’s an easy day for me to remember because it’s also my only brother’s birthday. Tater tots are an iconic American food that was created in the early 1950’s. The founders of Ore-Ida were trying to figure out what to do with all the little leftover pieces of potato that they had tons of everyday. They chopped up the potato pieces, mixed them with flour and seasonings, then forced the mixture through the barrel of an extruder, slicing off little one-inch pieces as the mixture came through. And so the tater tot was born.

Actually, when the little potato nuggets were first created, they didn’t have a name for them so the owners of Ore-Ida decided to have a name-the-product contest among their employees. The name “Tater Tots” was submitted by a young mother named Clora Lay Orton. Everyone loved the name and she won the contest.

It’s hard to believe that when the inexpensive tater tots were first sold in stores in 1956, they didn’t exactly fly off the shelves. Today, Americans consume approximately 70 million pounds of them per year! It’s safe to say the lowly tater tot has finally found its place in society, from school cafeterias to the ever popular food truck. It’s certainly found its way to our dinner table!

CHEESY BACON TATER TOTS

  • 1 bag frozen tater tots
  • 1 cup sour cream
  • 3/4 cup ranch dressing
  • 1 cup shredded cheddar cheese
  • 1 cup shredded mozzarella cheese
  • 6 slices bacon, fried crisp and crumbled
  • 2 stalks green onions, chopped
  1. Bake tater tots according to package directions.
  2. While tots are baking, combine sour cream and ranch dressing in a bowl.
  3. Drizzle sour cream mixture over baked tater tots.
  4. Sprinkle cheeses over the top.
  5. Place under broiler until cheese is completely melted.
  6. Remove from broiler and top with crumbled bacon and green onions.
  7. Return to broiler for 2-5 minutes to warm up the bacon.
  8. Serve hot.

Velveeta Cheese Sauce

Velveeta Cheese Sauce | Pinky's PantryI know, I know…. you can say it….. Velveeta is NOT cheese. Even the box says it’s “Pasteurized Prepared Cheese Product.” (When I was a kid I remember it used to say, “Pasteurized Process Cheese Food.”) But don’t dis Velveeta. Whatever it is, it’s delicious. Smooth, creamy, and meltable (is that a word?), it made the best grilled cheese sandwiches ever….. the grilled cheese sandwiches of my youth that spelled comfort food. It’s what we grew up with in the Philippines. It was introduced by the Americans during World War II and stayed a big part of Filipino cuisine ever since. It’s all I knew of cheese until I moved to the United States.

Velveeta makes the easiest and creamiest of cheese sauces as far as I’m concerned. You can cook it in a small saucepan over medium heat on the stove, or if you’re pressed for time, you can make it in the microwave. If you use a microwave, be sure to stop and stir in 30-second intervals so you don’t get hot spots that turn into burned spots. The sauce will thicken and firm up as it cools. Just reheat it a bit if you need to make it pourable again. If it’s too thick, whisk in some more milk until it reaches the consistency you want.

VELVEETA CHEESE SAUCE

  • 1 cup cubed Velveeta cheese
  • ¼ cup evaporated milk or fresh milk (add more if you want the sauce thinner)
  1. Microwave Velveeta and milk in a microwaveable bowl on high for 2-3 minutes, stopping to stir every 30-seconds or so, until completely melted and well-combined.
  2. Serve immediately as a dipping sauce; pour over cooked veggies like broccoli or cauliflower; or pour over nachos.

NOTE:  ¼ cup is just a starting point for the milk. If you feel it’s too thick, add as much milk as you need to get it to the consistency you’re looking for.

You can also add flavorings to your cheese sauce like a teaspoon or so of mustard powder, a splash of beer or white wine, a tablespoon or two of diced pimientos, a dash of Tabasco or Sriracha sauce, a half teaspoon of onion powder, or whatever else you think might taste good with cheese.

Cheese Crostini

Cheese Crostini | Pinky's Pantry
This recipe for cheese crostini is so simple to make and takes hardly any time. If you’re looking for a nice accompaniment to a crisp salad or a hearty bowl of soup, you need look no further than this recipe.

These crostinis are great served warm from the oven. But let them cool down for a few minutes before serving so you don’t burn the roof of your mouth. When I pull these out of the oven, the family can hardly wait for them to get to the table. I have to slap away the hands trying to sneak one off the baking sheet!

CHEESE CROSTINI

  • 1 loaf (1 lb.) Italian or french bread, sliced
  • ½ cup mayonnaise
  • ½ cup sour cream
  • 1 packet (.7 ozs.) Good Seasons Italian salad dressing mix
  • 1½ cups shredded mozzarella (or other white cheese like monterey jack)
  1. Preheat oven to 350ºF.
  2. Combine mayonnaise, sour cream, salad dressing mix and cheese together in a medium bowl.
  3. Spread over bread slices.
  4. Bake for 10 minutes or until tops begin to brown

NOTE:  I like Good Seasons Italian salad dressing mix, but you really could use any brand you like.

Tomato Bisque with Crispy Mozzarella Cubes

Tomato Bisque | Pinky's Pantr
Today was a scary day at work. I arrived at the office to be greeted with the news that our Vice President had called an impromptu “Organizational Announcement” meeting. Everyone was to report to the meeting at 9 a.m. sharp. The VP’s announcement was that they were going to be outsourcing some of our jobs and some people would be laid off at the end of this year. So sad. It’s hard to understand the business decision to cut costs by sending our work abroad, but it’s harder to accept when good, hardworking employees of long standing are laid off without a qualm. I’m one of the lucky ones who gets to keep her job but my heart breaks for my friends who don’t.

I think comfort food is called for tonight. And what could be more comforting than a yummy bowl of tomato soup? Add a grilled cheese sandwich and you’re instantly transported back to those carefree childhood days when it seemed like nothing could go wrong. This soup is delicious and very easy to make. Instead of grilled cheese sandwiches, I gave it a different touch by making Crispy Mozzarella Cubes to serve with it. Yum! Now if only the job situation at work were as easy to fix. Sigh…..

TOMATO BISQUE

  • 2 tbsp. olive oil
  • 1 small onion, diced
  • 1 clove garlic, minced
  • 3 sprigs fresh thyme
  • 1 28-oz. can crushed tomatoes in puree
  • 1½ cups chicken broth
  • 3 tbsp. honey
  • ⅓ cup heavy cream
  • salt and pepper, to taste (optional)
  • 2 tbsp. chopped fresh parsley (optional)
  1. In a medium pot, heat the oil.
  2. Add the onion and cook over medium heat, stirring frequently, until translucent.
  3. Add the garlic and thyme, stirring until fragrant.
  4. Add the tomatoes, broth, and honey, and stir together well.
  5. Season with salt and pepper if desired, and bring to a boil over high heat.
  6. Reduce heat to medium-low and simmer about 15 minutes, stirring frequently.
  7. Remove and discard thyme sprigs.
  8. Puree soup with an immersion blender. If you want it chunky, puree only half the soup.
  9. Stir in the cream, adjust the seasonings, and continue to cook for another minute or two.
  10. Ladle soup into bowls and garnish with parsley, if desired.

CRISPY MOZZARELLA CUBES

  • 1 block of mozzarella cheese (size depends on how many cubes you want to make)
  • flour
  • egg
  • panko bread crumbs
  • salt and pepper, to taste
  1. Heat 2 inches of canola oil in a deep frying pan on the stove.
  2. Cut mozzarella cheese into cubes as small or large as you like. I like a good-sized cube so I cut them about 1½ inches big.
  3. Place about 1 cup flour in a pie plate and season lightly with a little salt and pepper.
  4. Beat 1 egg in a shallow bowl and season lightly with a little more salt and pepper.
  5. Place about 1 cup panko bread crumbs in another pie plate.
  6. Take a mozzarella cube and coat it first in flour, then egg, and finally bread crumbs. Repeat with remaining cubes. If you run out of flour or bread crumbs, just add more, and beat another egg if you need to.
  7. Carefully drop each coated mozzarella cube into hot oil.
  8. Deep fry until golden brown.
  9. Transfer briefly to paper towel lined plate to drain.
  10. Serve hot.

Pull-Apart Pesto Cheese Bread

Pull-Apart Pesto Cheese Bread | Pinky's Pantry
I keep seeing recipes for pull-apart breads everywhere…. pull-apart cheese bread, pull-apart bacon ranch bread, pull-apart cinnamon bread….. Well, I had some leftover Costco pesto sauce and I wanted to use it up before it hit the expiration date so I thought, “why not pull-apart pesto bread?” It sounded like it would be good, don’t you think? So I made a quick stop at the store to buy a french bread boule and some provolone cheese. Here’s what I came up with.

PULL-APART PESTO CHEESE BREAD

  • 1 round french boule (bread bowl)
  • 1 lb. sliced white cheese, such as provolone, swiss, monterey jack, etc.
  • ½ cup butter
  • ⅓ cup basil pesto
  1. Preheat oven to 400ºF.
  2. Lay a sheet of aluminum foil on top of a cookie sheet and place the bread on it.
  3. Slice the bread lengthwise being careful not to cut all the way to the bottom of the loaf.
  4. Next slice the bread crosswise, again taking care not to cut all the way to the bottom, so you have little 3/4-inch squares.
  5. Insert slices of cheese into the cuts between each bread cube, cutting cheese as necessary to fit.
  6. Melt butter in a small bowl in microwave.
  7. Add pesto to melted butter, stirring to combine well.
  8. Spoon all over bread making sure pesto butter goes into the cuts.
  9. Wrap foil closed over bread.
  10. Bake for 15 minutes.
  11. Open up foil and bake an additional 15 minutes or until cheese is melted and top is golden brown.
  12. Transfer bread to a platter and serve immediately. To eat, everyone just pulls a little cube of bread out.

NOTE:  This bread is best served warm out of the oven.

Onion Cheese Puffs

Onion Cheese Puffs | Pinky's Pantry
New Year’s Eve for me means time for new appetizers. Every New Year’s Eve, I make a whole bunch of savory appetizers and bite-sized sweet treats. I don’t bother fixing dinner or creating a fancy sit-down meal. Instead, I start putting out different appetizers and canapés at around 7 p.m. for people to graze on all night long. Everyone just wanders up to the dining table and eats whatever they want to whenever they feel like eating.

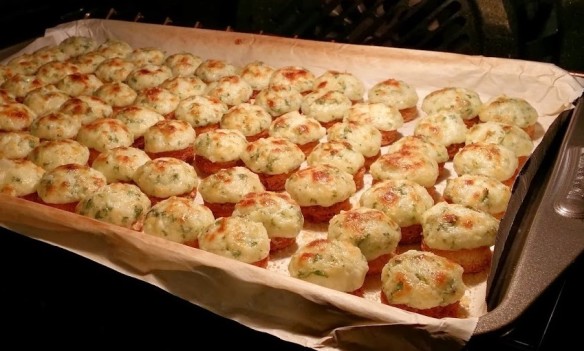
I usually make some tried-and-true favorites, but this is also the time that I look for new appetizer and dip recipes to try. These Onion Cheese Puffs were one of my newbies. I found the recipe in an old issue of Saveur magazine and thought they sounded good. They were so easy to make and smelled amazing while they were baking! Of all the new appetizers I tried for our New Year’s Eve celebration this year, I liked these the best. Definitely a keeper!
Onion Cheese Puffs | Pinky's Pantry

ONION CHEESE PUFFS

  • ½ small sweet yellow onion, finely chopped
  • ½ cup mayonnaise
  • 3 tbsp. grated Parmesan cheese
  • 2 tbsp. finely chopped fresh parsley
  • salt and pepper, to taste
  • 8 slices of white bread
  1. Preheat oven to 350°F.
  2. Mix onion, mayonnaise, parmesan cheese, and parsley in a medium bowl.
  3. Season with salt and pepper.
  4. Using a 1″ round cookie cutter, cut 4 rounds from each slice of bread.
  5. Place bread rounds on a cookie sheet and bake, without turning, until lightly toasted, about 6-7 minutes.
  6. Preheat broiler.
  7. Spread about 1 tsp. onion mixture onto each round, then sprinkle with more parmesan.
  8. Brown under broiler for 1–2 minutes.
  9. Serve immediately.
[Adapted from Saveur]

Cheesy Mexican Chicken Lasagna

Mexican Chicken Lasagna | Pinky's PantryIt was bunco night at the home of my sister’s good friend, Kelly. My sister plays bunco once a month with a group of her friends and every now and then, when someone can’t make it, I stand in as a substitute. It’s a lot of fun and a good way to get out of the house for a while. This was an especially fun night because I won the pot!

Kelly served a Mexican Chicken Lasagna for dinner before the games began. The recipe was one she had taken from a Pampered Chef cookbook. It was so delicious, I got the recipe so I could make it at home for my family. I changed a few things, but otherwise, the recipe is easy and is perfect for feeding a crowd. Just in time for Cinco de Mayo!
Mexican Chicken Lasagna | Pinky's Pantry

CHEESY MEXICAN CHICKEN LASAGNA

  • ½ cup lightly packed fresh cilantro leaves, chopped
  • 2 boxes (8 oz. each) cream cheese
  • 3 cups shredded Monterey Jack cheese
  • 1 medium onion, chopped
  • 1 large can (28 oz.) enchilada sauce
  • 12 (6-inch) corn tortillas
  • 2-3 lbs. shredded cooked chicken (I used boneless, skinless chicken thighs)
  1. Microwave cream cheese for 30-45 seconds or until very soft.
  2. Add cilantro and 2 cups of the Monterey Jack cheese; mix well.
  3. Spread 2/3 cup enchilada sauce on the bottom of a 9×13 baking pan.
  4. Pour remaining enchilada sauce into a shallow bowl or pie pan.
  5. Submerge 4 of the tortillas into the sauce in the pie pan one by one, and arrange them on the bottom of the baking pan, overlapping as needed.
  6. Spread 1/3 of the cream cheese mixture over the tortillas. This is hard to do. You may want to just dollop it on and press each dollop down with a spatula.
  7. Sprinkle with 1/3 of the chicken and 1/3 of the chopped onions.
  8. Repeat layers 2 more times.
  9. If you have any enchilada sauce left, drizzle it over the top of the casserole.
  10. Top with remaining 1 cup of Monterey Jack cheese.
  11. Bake at 350º F for 30 minutes or until cheese is melted and casserole is hot.
  12. If desired, you could garnish with additional chopped cilantro leaves before serving.

NOTE:  Shredded rotisserie chicken is great in this recipe.

Breakfast Egg Puff

Breakfast Egg Puff | Pinky's PantryJessica, one of my co-workers, gave me this recipe some months ago. It’s perfect for breakfast or brunch with the family or to take to a potluck with friends. The eggs puff up into a light, golden, soufflé-like dish that goes really well with sausage, ham or bacon; and the cheese provides a rich flavor that to me makes the addition of salt unnecessary.

This recipe lends itself to some interesting flavor variations so if you don’t want to serve a plain egg dish, you could add any one of the following ingredients to the mixture or try a combination of them:
1 large can diced green chiles
1/2 cup chopped mushrooms
2 stalks green onions, chopped
1/2 cup diced bell peppers
1/4 lb. bulk sausage, browned and drained well
any other ingredients you might want to try

As with any soufflé type of dish, the eggs puff up while baking but will start to fall shortly after removing from the oven so although it’s not entirely necessary, it’s nice if you can serve this dish as soon after taking it out of the oven as possible.

BREAKFAST EGG PUFF

  • 12 eggs
  • 16 oz. cottage cheese
  • 1 lb. shredded cheese (combination of ½ lb. monterey jack and ½ lb. cheddar)
  • ½ cup flour
  • 1 teaspoon baking powder
  • ½ cup melted butter
  • ½ tsp. salt, or to taste (optional)
  1. Preheat oven to 350ºF and grease a 9×13 rectangular pyrex baking dish.
  2. Beat eggs in a large bowl.
  3. Stir in rest of ingredients.
  4. Pour into prepared baking dish and bake for 25 minutes.