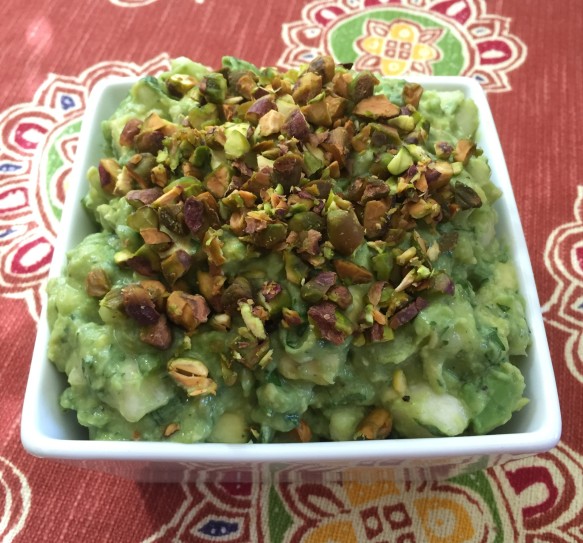
Pear and Pistachio Guacamole

Pear and Pistachio Guacamole | Pinky's Pantry
I saw this recipe on foodnetwork.com and I thought it would be fun to make a different kind of guacamole for Cinco de Mayo. This guacamole recipe couldn’t be any more different from the traditional, but it was delicious! It had a slightly sweet, slightly spicy flavor that went great with tortilla chips and was a perfect addition to our Cinco de Mayo dinner.

PEAR AND PISTACHIO GUACAMOLE

  • 3 Hass avocados, halved, pitted and cubed
  • 2 firm ripe Seckel pears or 1 large Anjou pear, cored and finely diced
  • 2 Tbsp. chopped fresh cilantro
  • juice of 1½ – 2 fresh limes
  • 1 clove garlic, finely chopped
  • 1 small jalapeño, minced (if you want it less spicy, remove the seeds)
  • ½ tsp. salt
  • ¼ tsp. pepper
  • 3 Tbsp. chopped roasted pistachios
  • lime wedges, for serving
  • blue corn tortilla chips, for serving
  1. Toss together the avocados and pears in a medium bowl.
  2. Stir in the cilantro, juice from 1½ limes, garlic, jalapeño, salt, and pepper.
  3. Taste and adjust seasoning with additional lime juice, salt, and pepper if desired.
  4. Transfer to a serving bowl and sprinkle pistachios over top.
  5. Serve with lime wedges and blue corn tortilla chips.


Warm Mexicorn Dip

Warm Mexicorn Dip | Pinky's Pantry
This dip has been a long time favorite in my family. It’s very, very easy to make because you just throw all the ingredients into a bowl and microwave it! It’s a great appetizer for a Cinco de Mayo party. I you want to make this meatless, you can omit the bacon. I think it’s fine without it, but my kids swear it tastes better with bacon. Either way, you’ve got to give this recipe a try. You won’t be sorry. Make sure you serve it warm!

WARM MEXICORN DIP

  • 4 cans (11 ozs. each) Green Giant mexi-corn, drained well
  • 3/4 cup mayonnaise
  • 2/3 of a 16-oz. container sour cream
  • 16 ozs. shredded cheddar cheese
  • 3 or 4 green onion stalks, chopped (depends on how big they are)
  • salt and pepper, to taste
  • 8 slices bacon, fried crispy and crumbled
  1. Mix all the ingredients in a microwave-safe dish.
  2. Microwave until hot and bubbly, stopping to stir halfway through (about 5 minutes).
  3. Serve warm with tortilla chips.

Totchos

Totchos | Pinky's PantryThis recipe is a play on traditional Nachos, except instead of tortilla chips, you use tater tots. It makes a hearty and delicious appetizer, or can be served for a yummy brunch dish. Try to have whatever toppings you’ve chosen all ready to go so that as soon as the cheese is melted over the tater tots, you can pile on your toppings and serve right away. The longer the tater tots sit with the toppings on them, the less crunchy they become. Not that that’s a bad thing. My family just prefers them crunchy.
Totchos | Pinky's Pantry

TOTCHOS

  • 1 bag (2 lbs.) frozen tater tots
  • 3 cups shredded cheddar cheese
  • sour cream, thinned with a little water or milk till pourable
  • fresh cilantro, coarsely chopped

Toppings:

  • chorizo, removed from casing, crumbled and cooked
  • refried beans or black beans
  • diced red onion
  • sliced black olives
  • whole kernel corn
  • sliced pickled jalapeños
  • pico de gallo, or your favorite salsa
  • guacamole
  1. Line a jellyroll pan with foil.
  2. Arrange tater tots in single layer on baking pan and bake according to package directions until brown and crispy.
  3. Remove from oven and sprinkle cheese over tater tots.
  4. If necessary, return to oven and bake just until cheese is all melted.
  5. Remove from oven and top with any combination of the toppings listed above. You can use as much or as little as you like of the toppings.
  6. Drizzle sour cream over everything.
  7. Sprinkle with cilantro for garnish.
  8. Serve immediately.

Dulce de Leche Bars

Dulce de Leche Squares | Pinky's Pantry
I love dulce de leche. It’s so delicious, I can eat it by the spoonful! I thought it would be fun to make some kind of bars with dulce de leche in them. So I made up this recipe with a blondie base and ready-made dulce de leche. It turned out great! The kids loved them. I’ll definitely be making these again!
Dulce de Leche Squares | Pinky's Pantry

DULCE DE LECHE BARS

  • 1½ cups flour
  • 2 tsp. baking powder
  • ¼ tsp. salt
  • ½ cup (1 stick) butter, melted
  • 1 cup firmly packed brown sugar
  • 2 eggs
  • 1 tbsp. vanilla extract
  • 1 cup chopped pecans or walnuts
  • 1 can (13.4 ozs.) dulce de leche (or you can make your own)
  • ¼ cup evaporated milk (can substitute fresh milk)
  1. Preheat oven to 350ºF. Line a 9×13 baking pan with foil and grease foil lightly.
  2. In a small bowl, mix together flour, baking powder and salt.
  3. In a large bowl, melt butter in microwave.
  4. To melted butter, add brown sugar, eggs, vanilla and nuts, stirring to combine.
  5.  Add flour mixture to butter mixture, mixing together well. Batter will be thick.
  6. Reserve 1 cup of the batter and set aside.
  7. Spread remaining batter into prepared pan. It will seem like you don’t have enough batter to completely cover the bottom of the pan, but just do your best, spreading as thinly as you need to.
  8. Bake for 15 minutes.
  9. While bottom crust is baking, empty dulce de leche into a bowl and add milk.
  10. Microwave in 30-second increments, stirring after every 30 seconds, until dulce de leche is completely combined with milk and is soft and pourable.
  11. Remove cooked crust from oven and pour dulce de leche over crust, spreading to within ¼-inch of edges.
  12. Drop spoonfuls of reserved 1 cup batter randomly over dulce de leche layer.
  13. Cut through batter and dulce with a knife to create a marbled effect.
  14. Return to oven and bake an additional 15-20 minutes or until set.
  15. Cool on wire rack, then lift foil from pan to remove.
  16. Cut into bars or squares.

Chicken Pozole

Chicken Pozole | Pinky's Pantry
Marta is a lovely Mexican lady who works in the cafeteria downstairs at my office. She makes a wonderful Chicken Pozole. Everyone loves it! Whenever she would make it, the cafeteria would run out of it roughly about 20 minutes after it was put out. Eventually, she learned to just make a huge vat of it so that it wouldn’t disappear so quickly and everyone could get some.
Chicken Pozole | Pinky's Pantry
I asked Marta how she made her pozole and she gave me a quick run down. This recipe was my attempt at trying to mimic Marta’s pozole. The fam devoured it and it’s now become a family favorite. It’s great because I can buy pre-shredded rotisserie chicken at Costco which really saves me a lot of time. When you serve it, just put the soup in a large tureen surrounded by bowls of the different condiments so everyone can help themselves.Chicken Pozole | Pinky's Pantry

CHICKEN POZOLE

  • 2 cups shredded rotisserie chicken
  • 2 tbsp. canola oil
  • ½ large yellow onion, chopped
  • 4 garlic cloves, minced
  • ½ tsp. oregano
  • 1 (4.5 oz.) can diced green chiles
  • 1 (28 oz.) can chopped tomatoes, drained
  • 1 (7 oz. can) canned salsa verde
  • 1 (49 oz. can) chicken broth
  • 2 (15 oz. cans) hominy, drained
  • salt & pepper, to taste

Condiments:

  • raw cabbage, shredded
  • red onion, finely chopped
  • cilantro leaves, chopped
  • lime, cut into wedges
  • radishes, thinly sliced
  • avocado, diced
  • crushed red pepper
  • Mexican queso fresco, crumbled
  • tortilla chips, crushed or left whole
  • sour cream
  1. Heat oil in a large stockpot over medium heat.
  2. Add the onion and cook until onion begins to become translucent.
  3. Add garlic and cook another 3-4 minutes.
  4. Add the oregano, green chiles, chopped tomatoes, and salsa verde, and cook until it just comes to a boil, about 2 minutes.
  5. Add the chicken broth and hominy and return to a boil.
  6. Lower heat to medium and simmer for at least 10 minutes to allow flavors to develop.
  7. Season with salt and pepper to taste.
  8. Add the shredded chicken and cook until heated through, 3 minutes.
  9. Serve with bowls of condiments on the side.

Chocoflan Cake

Chocoflan Cake | Pinky's Pantry
Growing up in the Philippines, we ate Leche Flan Cake all the time. Filipino Leche Flan Cake is a rectangular sponge cake with a thin layer of flan on top of it. It was a special treat and one that we kids loved. There was a canteen at my Lolo’s (grandpa’s) office that sold it for a few cents a serving.

I had never heard of “Chocoflan” Cake until I came to the United States. It’s apparently a Mexican favorite and is just like Filipino Leche Flan Cake only made with chocolate cake and with a much thicker layer of flan. It’s also baked in a bundt pan instead of a rectangular cake pan.

When I originally learned to make Chocoflan Cake years ago, you poured cajeta sauce over the cake before serving. I didn’t like that very much. I thought the cajeta sauce was way too sweet and had a flavor I didn’t particularly care for, so I dropped that step. We also used whole milk in the flan but I like the richness imparted by evaporated milk much better. One day I thought, “what if I add some dulce de leche as a surprise layer in the dessert?” That idea turned out to be a big hit with my kids so I’ve done it that way ever since.

I have to warn you, whenever I make this cake, the dulce de leche layer never ends up in the same place! Sometimes it ends up right at the top of the cake, sometimes it sits in the center between the flan and the cake, sometimes it’s thicker on one side than on the other, sometimes it’s all pooled on one side with nothing on the other! I have tried numerous times to make it end up consistently at the top of the cake to no avail. I finally gave up. Who cares? The point is, the cake is to die for and the little surprise bites of dulce de leche are absolutely scrumptious! You’ve really got to try this recipe. I promise it’s worth every bite!
Chocoflan Cake | Pinky's Pantry

CHOCOFLAN CAKE

  • 1 can dulce de leche (storebought or homemade)
  • 1 box devil’s food cake mix, plus ingredients listed behind box to make it
  • 4 ozs. (½ box) cream cheese, softened
  • 1 14-oz. can condensed milk
  • 1 12-oz. can evaporated milk
  • 1 tsp. vanilla extract
  • 5 eggs
  1. Prepare a water bath by placing a roasting pan half full of water into oven.
  2. Turn oven on to 350ºF to preheat.
  3. In a medium bowl, prepare flan by mixing together cream cheese, condensed milk, evaporated milk, vanilla, and eggs until well blended.
  4. In another bowl, prepare chocolate cake mix according to package directions. I don’t bother using an electric mixer for this step. I just stir the batter together with a wire whisk or a wooden spoon.
  5. Spray a 12 to 15-cup bundt pan with cooking spray.
  6. Empty dulce de leche into a small glass bowl and heat in microwave for a minute to soften and make it pourable.
  7. Pour dulce de leche into bottom of bundt pan.
  8. Pour chocolate cake batter over dulce de leche in bundt pan.
  9. Slowly pour flan mixture over chocolate batter. Don’t worry if it sinks or causes the batter to separate in clumps.
  10. Spray a piece of foil with cooking spray and cover bundt pan tightly.
  11. Place pan into water bath in oven.
  12. Bake for 50 minutes. Do not uncover during baking.
  13. Remove from water bath and allow to cool to room temperature; then place in refrigerator to chill for at least 4 hours or overnight.
  14. Invert cake onto a large serving platter.
  15. If desired, stir a little milk or cream into some dulce de leche to thin it to a pouring consistency and drizzle over cake right before serving.

NOTE:  Chocoflan Cake is best prepared a day or two in advance and kept refrigerated until ready to serve.

Taco Soup

Taco Soup | Pnky's Pantry
It’s been kind of cold lately and chilly weather always makes me think of soup when I start planning on what to make for dinner. Who doesn’t love a nice, steaming bowl of hot soup on a cold wintry evening?

This is a delicious, hearty, crockpot soup that’s the perfect choice to feed the family when you’ve just come home from work and are too tired to fuss with dinner. I learned this recipe from one of my officemates, a sweet lady named Janet. The recipe is great because I usually have all the ingredients I need sitting in my pantry which makes it a breeze to throw together. You could also make this in a soup pot on the stove if you don’t feel like lugging out the old crockpot. And best of all, this recipe is completely gluten free so my daughter, Spunky, can eat it too. Everyone who’s tried this soup loves it. And it really goes over big when you have a houseful of hungry kids!

TACO SOUP

  • 1½ lbs. ground beef
  • 1 small onion, chopped
  • 2 (15 oz.) cans whole kernel corn, do not drain
  • 2 (14.5 oz.) can diced tomatoes, do not drain
  • 1 (15 oz.) can red kidney beans, do not drain
  • 1 (15 oz.) can tomato sauce
  • 2 (2.25 oz.) cans sliced black olives, drained
  • 1 cup water
  • 3 packets taco seasoning mix
  1. Brown ground beef and onions in skillet.
  2. Drain ground beef and transfer to a crockpot.
  3. Add remaining ingredients and stir together well.
  4. Set on high and cook for 1 hour or until hot.
  5. Serve with sliced avocado, sour cream, grated cheese, sliced green onions, and tortilla chips.

NOTE:  If the soup seems too thick, you can stir in a little water to thin it out.

Homemade Dulce de Leche

Dulce de Leche | Pinky's PantryDulce de Leche is a South American caramel confection. It’s made by cooking sweetened condensed milk until the sugar is caramelized and the milk is thickened and brownish in color. I remember my Mom boiling an unopened can of condensed milk for what seemed like hours on the stove. Of course we all grew up hearing the horror stories and dire warnings of how you should be careful because the can could explode, but none of that ever seemed to matter. What was most important was getting a taste of that sweet, thick, and sticky treat. I remember how awfully hard it was to wait for it to be ready, and even harder to wait for it to cool! But you had to let it cool before you could open the can or the dulce would spurt out and could burn you. We would eat it by the teaspoonful, carefully eking it out and eating it ever so slowly to make it last as long as possible because Mom would never let us have more than 2 little spoonfuls of it in one day.

There are many different ways to make your own dulce de leche at home. You could do like my Mom always did and boil an unopened can of condensed milk on the stove for 2 or 3 hours. You could bake an unopened can in a water bath in the oven; or cook a can in a pressure cooker; or cook it in a slow cooker; or open a can, empty the milk into a pot and cook the milk over the stove, stirring till your arm falls off (don’t ask me how I know). Why, I’ve heard you could even make it in a microwave!

My favorite method is super easy and doesn’t involve any risk of explosion or having your arm fall off. Give it a try and you’ll see what I mean.

HOMEMADE DULCE DE LECHE

  1. Empty 1 can of sweetened condensed milk into a glass pie plate.
    Dulce de Leche | Pinky's Pantry
  2. Cover pie plate tightly with foil.
    Dulce de Leche | Pinky's Pantry
  3. Make a water bath by placing a pan larger than the pie plate into the oven and filling it with enough water to go 3/4 up the side of the pie plate.
  4. Place pie plate in center of water bath and bake at 400ºF for 1½ hours or so, adding water as needed. The longer you cook it, the darker the caramel gets.
    Dulce de Leche | Pinky's Pantry
  5. Remove foil. The edges are usually more cooked than the center so take a wire whisk and whisk everything together until it’s well-combined and smooth.
    Dulce de Leche | Pinky's Pantry
  6. Pour into a clean jar and allow to cool before using.
  7. Store dulce de leche in the refrigerator for up to 3 weeks.

Cheater Chilaquiles

Chilaquiles | Pinky's Pantry
Chilaquiles (pronounced chee-lah-kee-less) is comfort food for most Mexicans. It was what your mom made you for breakfast when she had some leftover tortillas that needed to be used up before they went completely stale. The dish is basically made by cutting corn tortillas into quarters and lightly frying them. Then green or red salsa is poured over the fried tortillas and they’re simmered until they begin to soften, after which they’re sprinkled with cheese. They’re often served with eggs and beans on the side.

One of my co-workers who’s Mexican taught me how to make what I dubbed her “Cheater Chilaquiles.” I named them that because her version uses purchased tortilla chips and that’s cheating! LOL!  It’s actually an incredibly easy recipe without all the steps to it that traditional chilaquiles has. Yet for all its simplicity, I must say this dish is absolutely delicious! My Old Goat Honey sure loves it. In fact, everyone who’s tried it loves it and I always get asked for the recipe.
Chilaquiles | Pinky's Pantry

CHEATER CHILAQUILES

  • 8 ozs. tortilla chips
  • 1 lb. bulk breakfast sausage
  • 1 large can (28 ozs.) mild green chile enchilada sauce
  • 1 can (10 ozs.) Ro-Tel diced tomatoes & green chilies, undrained
  • 2 cups shredded Mexican cheese blend (or any kind of cheese you like)
  1. Preheat oven to 350ºF.
  2. Pour tortilla chips into a 9×13 baking dish.
  3. In a small saucepan, brown the sausage and drain well.
  4. Add enchilada sauce and Ro-Tel to cooked sausage and mix well.
  5. Pour sausage mixture over tortilla chips.
  6. Top with cheese.
  7. Bake until cheese melts, about 10 minutes.
  8. Serve with fried eggs and a side of beans.

NOTE:  If you want, you could puree the Ro-Tel in a blender before stirring it into the sauce. That’s actually what my co-worker did, but I was too lazy to pull out my blender the first time I made it and Old Goat loved it with the little chunks of tomato so I’ve made it this way ever since! You could also add chopped onions, diced bell pepper, sliced jalapeños, a small can of diced green chiles, or whatever veggies you want to the sauce. By the way, I usually sprinkle some crumbled Mexican “queso fresco” cheese like panela or cotija on top of the shredded cheese before I bake it. I think it adds an extra oomph! Or should I say “olé!”

Healthy Chorizo con Papas (Mexican Chorizo with Potatoes)

Chorizo con Papas | Pinky's Pantry
The 2012 issue of Saveur 100 magazine has a recipe for chorizo con papas featuring fresh homemade chorizo. I wanted to fix a big breakfast for the family this morning and thought Chorizo con Papas would fit the bill perfectly, but I needed it to be a little healthier and a whole lot quicker to prepare. This is my healthy, quick-and-easy version. I use vegetarian soy chorizo in place of regular pork chorizo. Also, I par-boil the potatoes which removes some of the starch from them. I do fry them in a little oil, but we all need a bit of fat in our diets and if you choose a heart-healthy fat like olive oil, it’ll be just fine.

My friend, Pooh, introduced me to soy chorizo. It’s a great substitute for pork chorizo when you’re trying to cut down on your fat intake. Reynaldo’s brand has a good spicy flavor without being overly hot which leaves it open for you to adjust the heat of the dish to your liking. Trader Joe’s makes a good soy chorizo, too. With zero cholesterol, soy chorizo is a heart-healthy and delicious substitute for the real thing. As an added bonus, it’s readily available at most local grocery stores and is quite reasonably priced.

If you want, you could add tabasco sauce or some other hot sauce to this dish to make it spicier. When I serve this for breakfast, I top each serving with a fried egg and add a couple of slices of Buttered Seasoned Toast. A little sour cream on the side and you’re ready to dig in!

HEALTHY CHORIZO CON PAPAS (MEXICAN CHORIZO WITH POTATOES)

  • 1 pkg. (12 ozs.) vegetarian soy chorizo
  • 2 medium potatoes, peeled and cut into ¾” cubes
  • 1 small onion, diced
  • 1 pasilla pepper, cut into large dice
  • olive oil for frying
  1. Boil cubed potatoes till partially cooked, about 7 minutes.
  2. Drain very well.
  3. Heat a little oil in a large skillet and fry potatoes until golden brown and crispy on all sides.
  4. Transfer to a paper towel lined plate.
  5. In same skillet, heat a little more oil and sauté onion and pasilla pepper until onion begins to turn translucent. Transfer to plate with potatoes.
  6. Remove soy chorizo from casing and add to skillet.
  7. Cook about 4 to 5 minutes, breaking up any large chunks with the back of a spoon.
  8. Add potatoes, onions, and peppers back into skillet with chorizo and stir until well combined.
  9. Top each serving with a fried egg and place buttered seasoned toast on the side.

NOTE:   For those of you who might want to try making your own fresh chorizo for this dish, I’m posting Saveur’s fresh chorizo recipe here.

Saveur’s Fresh Chorizo Recipe:

12 dried guajillo chiles, stemmed
8 dried chiles de árbol, stemmed
1 cup finely chopped cilantro
¼ cup apple cider vinegar
2 tbsp. paprika
2 tbsp. kosher salt
1½ tbsp. dried orégano, preferably Mexican
1 tbsp. ground black pepper
2 tsp. ground cumin
1 tsp. ground coriander
6 cloves garlic, finely chopped
2 lb. ground pork
8 oz. pork fatback, chilled and minced

Heat both chiles in a 12″ skillet over medium-high heat; cook, turning, until toasted, about 5 minutes. Transfer chiles to a bowl and cover with 4 cups boiling water; let sit until soft, about 15 minutes. Drain chiles, reserving ¾ cup soaking liquid, and transfer to a blender along with reserved soaking liquid, cilantro, vinegar, paprika, salt, oregano, pepper, cumin, coriander, and garlic; purée until smooth. Transfer purée to a bowl and add pork and fatback; mix until combined. Cover with plastic wrap and refrigerate for up to 1 week.