Sara Salad

Sara Salad | Pinky's PantryMy mom learned this recipe many years ago from a co-worker of hers named Sara. It quickly became a family favorite, so much so that at one point, Mom made it for almost every family gathering. The family called it Sara Salad. It’s an easy recipe because you don’t really need to measure the ingredients. Just add each ingredient to your taste. If you like peas, you can add more. If you want less cheese, you can lessen it. If you like it a little sweeter, sprinkle in a little extra sugar. You get the picture.
Sara Salad | Pinky's Pantry

SARA SALAD

  • 1 head iceberg lettuce, torn into bite-size pieces (about 6 cups)
  • 1 bag frozen peas (no need to thaw)
  • 1 lb. bacon, cooked until crisp and then crumbled
  • 2 cups shredded cheddar cheese
  • 1½ cups mayonnaise
  • 2 Tbsp. sugar
  • salt and pepper, to taste
  1. Layer half the lettuce on the bottom of a salad bowl.
  2. Top with half the peas, half the bacon, and half the cheddar cheese.
  3. Dollop half the mayo in teaspoonfuls over the top.
  4. Season with half the sugar, and a little bit of salt and pepper.
  5. Repeat layering with the remaining half of the ingredients.
  6. Cover the bowl with plastic wrap and refrigerate for 2 hours or up to overnight.
  7. Toss everything together right before serving.

For a variation, you can add other ingredients like:

  • ½ cup diced red onion
  • 1 bell pepper, diced
  • 2 tomatoes, chopped
  • 4 hard boiled eggs, chopped

Doughnut Bread Pudding

Doughnut Bread Pudding | Pinky's Pantry
Doughnuts can be found all over the world in some form or another but no one loves them more than Americans. It’s not uncommon for the couple of doughnut shops we have in town to run out of doughnuts by mid-morning. You gotta get there early and be prepared to stand in line if you want to be able to snag a few of your favorites. I love plain sugared doughnuts myself and whoever invented maple bacon doughnuts deserves a medal!

If you’ve ever been to a Krispy Kreme doughnut shop, you know just how mesmerizing it is to watch those sweet little rings move slowly along on the conveyer from formation, to frying, to glazing. And the first bite of that still warm, light-as-air confection makes you feel like you’ve died and gone to heaven.

This bread pudding is a great way to use up leftover donuts. It’s wonderful served plain on its own, but that being said, you’ve got to try it with my coffee cream sauce. After all, as most American cops can tell you, nothing goes better with a doughnut than coffee. Yum!

DOUGHNUT BREAD PUDDING

  • 1 doz. plain glazed doughnuts
  • 4 eggs
  • 4 cups milk
  • 1 tsp. vanilla
  • ½ cup sugar
  • ½ tsp. salt
  1. Preheat oven to 375°F. Butter a 9 x 13″ baking dish.
  2. Cut each doughnut into 8 pieces.
  3. Arrange the doughnut pieces in the buttered baking dish.
  4. Make custard by whisking together eggs, milk, vanilla, sugar, and salt until well blended.
  5. Pour the custard evenly over the doughnut pieces in the baking dish.
  6. Gently press the pieces down into the liquid so they all get soaked with custard.
  7. Let sit for at least 15 minutes to give the doughnuts time to absorb the custard. If you like a softer, more custardy texture, let the doughnuts soak for a longer period of time.
  8. Bake the pudding for 30-35 minutes or until the custard is set. It’s okay if the center jiggles slightly when you shake it.
  9. Remove from oven and cool for 10 minutes before serving.

NOTE:

  • This recipe can easily be halved and baked in a 9×9-inch square baking dish if you’re feeding less people.
  • You can also make this dish in advance. Just follow the recipe from Step 2 to 7, then cover the casserole and place in refrigerator overnight. The next day, remove casserole from refrigerator and let sit on counter for at least 30 minutes to bring to room temperature before continuing with Step 8.

Green Bean Salad with Cherry Tomatoes and Feta Cheese

Green Bean Salad | Pinky's Pantry
The July/August issue of Cook’s Illustrated magazine has an article on “The Best Way to Boil Green Beans.” The author talks about how he stumbled on a tip in the cookbook On Food and Cooking by Harold McGee that describes how heavily salted water speeds up the cooking of vegetables. According to him, the cookbook said the key was to cook your vegetables in water as salty as the sea which roughly translates to about 2 tablespoons of salt per quart of water. In typical Cook’s Illustrated fashion, the author proceeded to experiment, trying out different ratios of salt to water, to finally discover that the book was right and the heavily salted water produced tender, vibrantly green, deeply flavorful beans.

I decided to try the green bean salad recipe included in the article and serve it at Christmas dinner. The salad was a hit. I don’t have a copy of Harold McGee’s book so I don’t know if this secret works for other vegetables as well, but I’m definitely boiling green beans this way from now on.

GREEN BEAN SALAD WITH CHERRY TOMATOES AND FETA CHEESE

  • 1½ lbs. green beans, trimmed and cut into 2-inch lengths
  • ¼ cup salt
  • 12 ozs. cherry tomatoes, halved
  • ¼ cup extra virgin olive oil
  • 2 Tbsp. chopped fresh mint
  • 2 Tbsp. chopped fresh parsley
  • 1 Tbsp. lemon juice
  • ¼ tsp. each of salt and pepper
  • 2 ozs. (½ cup) feta cheese, crumbled
  1. Bring 2 quarts water to boil in large saucepan over high heat.
  2. Add green beans and 1/4 cup salt, return to boil, and cook until green beans are bright green and tender, 5 to 8 minutes.
  3. While green beans cook, fill a large bowl halfway with ice and water.
  4. Drain green beans in colander and immediately transfer to ice bath.
  5. When green beans are no longer warm to the touch, drain in colander again, then transfer to salad spinner and spin to dry thoroughly.
  6. Place green beans, tomatoes, oil, mint, parsley, lemon juice, salt and pepper in a bowl and toss to combine.
  7. Transfer to serving platter, sprinkle with feta, and serve.

NOTE:

  • If you don’t own a salad spinner, you can lay the drained green beans on a clean kitchen towel after shocking them in the ice water, and pat them dry.
  • The green beans can be blanched, shocked, and dried, then stored in a ziploc bag in the refrigerator for up to 2 days in advance.

Dessert Pizza

Dessert Pizza | Pinky's Pantry
This is an old Pampered Chef recipe that I learned to make many years ago. It’s very easy to do because the crust is made from refrigerated cookie dough. You can lay the fruit in any pattern or design you want. It makes a very pretty presentation and is sure to wow your dinner guests when you serve it. Little do they know how simple it was to make!

DESSERT PIZZA

  • 1 roll (16.5 oz) refrigerated sugar cookie dough
  • 1 box (8 oz) cream cheese, softened
  • ⅓ cup sugar
  • 4 cups assorted fresh fruit such as strawberries, kiwi, peaches, blueberries, raspberries, etc.
  1. Preheat oven to 350°F.
  2. For the crust, shape the cookie dough into a ball.
  3. Place ball in center of a cookie sheet or pizza pan and flatten it lightly with the palm of your hand.
  4. Roll out the dough to a 12-inch circle using a lightly floured rolling pin.
  5. Bake the sugar cookie crust for 18-20 minutes or until light golden brown.
  6. Remove from oven and allow to cool completely.
  7. In a small bowl, beat cream cheese and sugar until well combined.
  8. Spread the cream cheese mixture evenly over the top of the cookie crust.
  9. Arrange fruit over the cream cheese mixture in any design or pattern you want.

NOTE:  For a large 16-inch pizza like the one I have pictured, just double the recipe.

Here’s a picture of another one I made for a different occasion. As you can see, the design possibilities are endless with all the fruit combinations you can come up with.
Dessert Pizza | Pinky's Pantry

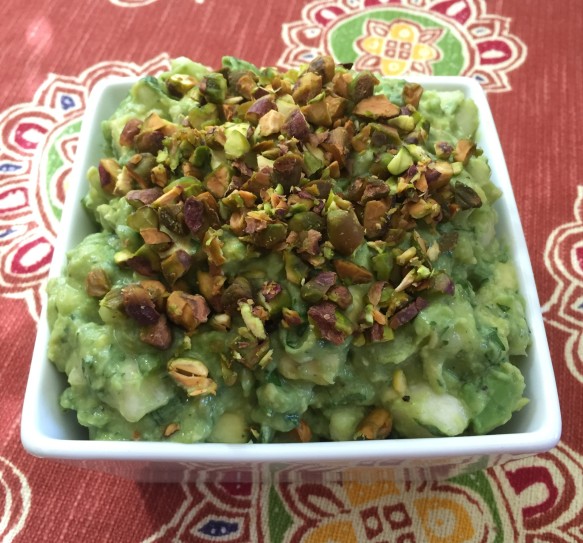
Pear and Pistachio Guacamole

Pear and Pistachio Guacamole | Pinky's Pantry
I saw this recipe on foodnetwork.com and I thought it would be fun to make a different kind of guacamole for Cinco de Mayo. This guacamole recipe couldn’t be any more different from the traditional, but it was delicious! It had a slightly sweet, slightly spicy flavor that went great with tortilla chips and was a perfect addition to our Cinco de Mayo dinner.

PEAR AND PISTACHIO GUACAMOLE

  • 3 Hass avocados, halved, pitted and cubed
  • 2 firm ripe Seckel pears or 1 large Anjou pear, cored and finely diced
  • 2 Tbsp. chopped fresh cilantro
  • juice of 1½ – 2 fresh limes
  • 1 clove garlic, finely chopped
  • 1 small jalapeño, minced (if you want it less spicy, remove the seeds)
  • ½ tsp. salt
  • ¼ tsp. pepper
  • 3 Tbsp. chopped roasted pistachios
  • lime wedges, for serving
  • blue corn tortilla chips, for serving
  1. Toss together the avocados and pears in a medium bowl.
  2. Stir in the cilantro, juice from 1½ limes, garlic, jalapeño, salt, and pepper.
  3. Taste and adjust seasoning with additional lime juice, salt, and pepper if desired.
  4. Transfer to a serving bowl and sprinkle pistachios over top.
  5. Serve with lime wedges and blue corn tortilla chips.


Warm Mexicorn Dip

Warm Mexicorn Dip | Pinky's Pantry
This dip has been a long time favorite in my family. It’s very, very easy to make because you just throw all the ingredients into a bowl and microwave it! It’s a great appetizer for a Cinco de Mayo party. I you want to make this meatless, you can omit the bacon. I think it’s fine without it, but my kids swear it tastes better with bacon. Either way, you’ve got to give this recipe a try. You won’t be sorry. Make sure you serve it warm!

WARM MEXICORN DIP

  • 4 cans (11 ozs. each) Green Giant mexi-corn, drained well
  • 3/4 cup mayonnaise
  • 2/3 of a 16-oz. container sour cream
  • 16 ozs. shredded cheddar cheese
  • 3 or 4 green onion stalks, chopped (depends on how big they are)
  • salt and pepper, to taste
  • 8 slices bacon, fried crispy and crumbled
  1. Mix all the ingredients in a microwave-safe dish.
  2. Microwave until hot and bubbly, stopping to stir halfway through (about 5 minutes).
  3. Serve warm with tortilla chips.

Hummingbird Cake

Hummingbird Cake | Pinky's Pantry
This is an old recipe that I got from one of my first cookbooks many, many years ago. Hummingbird Cake is basically a banana-pineapple-nut cake. It’s moist, delicious, and absolutely addictive. I usually bake it in a bundt pan and serve it plain, but you could also bake it in three round cake pans and frost each layer with a cream cheese frosting. Either way is delicious and will have you humming with delight!

HUMMINGBIRD CAKE

  • 3 cups flour
  • 2 cups sugar
  • 1 tsp. baking soda
  • 1 tsp. salt
  • 1 tsp. cinnamon
  • 3 eggs
  • 1½ cup vegetable oil
  • 2 tsp. vanilla extract
  • 2 cups ripe bananas, mashed
  • 1 can (8 ozs.) crushed pineapple in juice, undrained
  • 1 cup chopped walnuts or pecans
  1. Preheat oven to 350°F. Generously grease a bundt pan.
  2. In a large bowl, mix flour, sugar, baking soda, salt, and cinnamon with a wooden spoon.
  3. Add the eggs, oil, vanilla, bananas, pineapple, and nuts, and stir together well.
  4. Pour into prepared pan.
  5. Bake for 50-60 minutes, or until a toothpick inserted in the center comes out clean. (In my oven, 50 minutes is perfect, but depending on your oven, this could take up to 70 or 80 minutes.)

NOTE: If desired, cake may be baked in three 9-inch round cake pans. If using three cake pans, bake at 350°F for 25-30 minutes. Allow to cool completely, then frost with cream cheese frosting.

CREAM CHEESE FROSTING

  • 2 pkg. (8-oz. each) cream cheese, softened
  • 1 cup salted butter or margarine, softened
  • 4 cups powdered sugar
  • 2 tsp. vanilla extract
  1. With an electric mixer set on medium-low speed, beat cream cheese and butter until smooth.
  2. Add powdered sugar little by little, beating at low speed until blended.
  3. Stir in vanilla.
  4. Increase speed to medium-high, and beat until fluffy, 1 to 2 minutes.

Savory Pork Tenderloin

Savory Pork Tenderloin | Pinky's Pantry
I had some pork tenderloins in the freezer so I decided to put them out for dinner tomorrow. This dish is pretty easy to make and most of the time, you already have all the ingredients in your pantry. I like to marinate the pork overnight, but if you can marinate it for at least 4 hours, that works.

SAVORY PORK TENDERLOIN

  • 1 package pork tenderloins (package should contain two tenderloins)
  • ¼ cup soy sauce
  • ¼ cup lemon juice
  • ¼ cup sugar
  • 3 Tbsp. dijon mustard
  • 2 Tbsp. olive oil
  • 3 large cloves garlic, minced
  • ½ tsp. salt
  • ¼ tsp. pepper
  • 2 tsp. cornstarch dissolved in 3 tsp. cold water
  1. Place pork tenderloins into a gallon size ziploc bag.
  2. In a small bowl, whisk together soy sauce, lemon juice, sugar, dijon mustard, oil, garlic, salt, and pepper.
  3. Pour marinade into ziploc bag with tenderloins and seal, squeezing out as much air as possible.
  4. Let tenderloins marinate in the fridge overnight or for at least 4 hours.
  5. The next day, preheat oven to 350°.
  6. Place tenderloins into a small baking pan and pour the marinade all over them.
  7. Bake 1 hour or until done, flipping tenderloins over halfway through baking. The meat is done when a thermometer inserted into the thickest part reads 145°.
  8. Transfer tenderloins to a chopping board, tent them with foil, and let them rest for 10 minutes before slicing.
  9. While tenderloins are resting, pour the sauce into a small saucepan.
  10. Add the cornstarch/water mixture to the sauce and cook, whisking constantly, until sauce is thickened.
  11. Slice the tenderloins, then arrange the slices on a serving platter and pour the sauce over them.

Veggie Cream Cheese Roll-Ups

Veggie Cream Cheese Rollups | Pinky's Pantry
I stumbled across this recipe on justapinch.com. They have some great recipes on their website and this one was no exception. This yummy, vegetarian appetizer is great to serve at a party or take to a potluck. You can substitute lowfat cream cheese if you want to cut down on the fat. These colorful rolls look so pretty arranged on a platter. And the best part is….. they’re super easy to make!
Veggie Cream Cheese Rollups | Pinky's Pantry

VEGGIE CREAM CHEESE ROLL-UPS

  • 6 eight-inch flour tortillas (can use wheat, spinach, or tomato tortillas)
  • 2 pkg. (8 oz. each) cream cheese, softened
  • 1 envelope ranch dressing or dip mix
  • 4 green onions, finely chopped
  • ½ small can (4.25 oz.) chopped black olives
  • 1 celery rib, finely chopped
  • ½ cup finely chopped green bell pepper
  • ½ cup finely chopped red bell pepper
  1. Beat cream cheese and ranch mix together until smooth and well-blended.
  2. Stir in chopped vegetables with a rubber spatula.
  3. Spread cream cheese mixture evenly over tortillas.
  4. Roll up tortillas into logs and wrap each log in plastic wrap.
  5. Place tortilla logs in fridge to chill for at least 3 hours to set.
  6. Slice tortillas into ½-inch rounds before serving.

NOTE:

  • Can be served with salsa as a dip.
  • I don’t like a lot of olives in these rolls so I only use half a small can. Feel free to use the whole can if you like.

Chicken Piccata

Pinky's Pantry | Chicken Piccata
Chicken Piccata is one of my very favorite things to order from an Italian restaurant. Piccata actually refers to a method of cooking where something is sauteed in a sauce of butter, lemon juice and capers. In Italy, veal and fish are most often cooked in the piccata style, but chicken seems to be the popular choice in the United States. Whatever you choose, this dish is delicious and the impressive way it looks on a plate belies how simple it actually is to make.

CHICKEN PICCATA

  • 2 boneless, skinless chicken breast halves
  • salt and pepper, to taste
  • all purpose flour, for dredging
  • 2 Tbsp. olive oil
  • 2 Tbsp. butter
  • 1/3 cup fresh lemon juice
  • 1/3 cup dry white wine (I like Sauvignon Blanc)
  • 1/2 cup chicken broth
  • 3 Tbsp. capers, drained (or rinsed well if using capers cured in salt)
  • 3 Tbsp. chopped fresh parsley, optional
  1. Slice chicken breasts in half horizontally.
  2. Place chicken between 2 sheets of plastic wrap and pound to 1/4-inch thickness.
  3. Season chicken on both sides with salt and pepper to taste.
  4. Dredge chicken in flour until well-coated, shaking off excess flour.
  5. In a large skillet, heat olive oil and butter together over medium-high heat.
  6. Add chicken breasts and cook until golden and cooked through, about 3 minutes per side.
  7. Transfer cooked chicken to a plate.
  8. In the same pan where you browned the chicken, add lemon juice, wine, and broth, and bring to a boil, scraping up any brown bits at the bottom of the pan.
  9. Stir in capers, then return the chicken to the pan, including any juices that might have leaked out onto the plate.
  10. Continue to cook for another 4 or 5 minutes till the sauce reduces and thickens a little bit.
  11. Transfer to a serving platter and sprinkle with chopped parsley, if desired.

NOTE: Instead of half white wine and half chicken broth, you can make the sauce with just chicken broth or just wine. But don’t leave out the lemon juice. It’s a must!